Cinematic Composing
CC-Sampler User Manual
Everything in the sampler, explained: what each control does, the range it moves in, and when you'd reach for it. One manual covers all CC-Sampler libraries — a control that only exists in certain libraries is marked with a badge like Fluid Flutes
Chapter 1
Quick Start
From download to first note in five steps:
- Install. Run the installer from your customer dashboard —
.pkgon Mac,.exeon Windows. It installs the plugin (VST3 and, on Mac, AU) plus the CC-Sampler standalone app. - Open it. Load CC-Sampler in your DAW like any instrument plugin, or launch the standalone app to play without a DAW. If your DAW doesn't list it, rescan your plugins once.
- Sign in. Click Log In — your browser opens, you sign in with your Cinematic Composing account, and the plugin connects automatically. If your DAW blocks that handoff, use Or paste your token on the same screen instead.
- Download your library. The Your Libraries screen lists everything you own. Click Download, wait for the bar to finish, then click Load.
- Play. The main screen appears and MIDI input makes sound immediately. That's it.
Chapter 2
Your Libraries
The gear button ⚙ (top-right of the main screen) opens Your Libraries — the place to download, switch, and update libraries. Each library row shows one button for the one action that makes sense right now:
- Download — you own it but it's not on this machine yet.
- Load — it's installed; click to make it the active library. The active one shows a gold border and ACTIVE.
- Update — newer samples exist. One click re-downloads; your settings stay.
- Buy — you don't own it yet; opens the store in your browser.
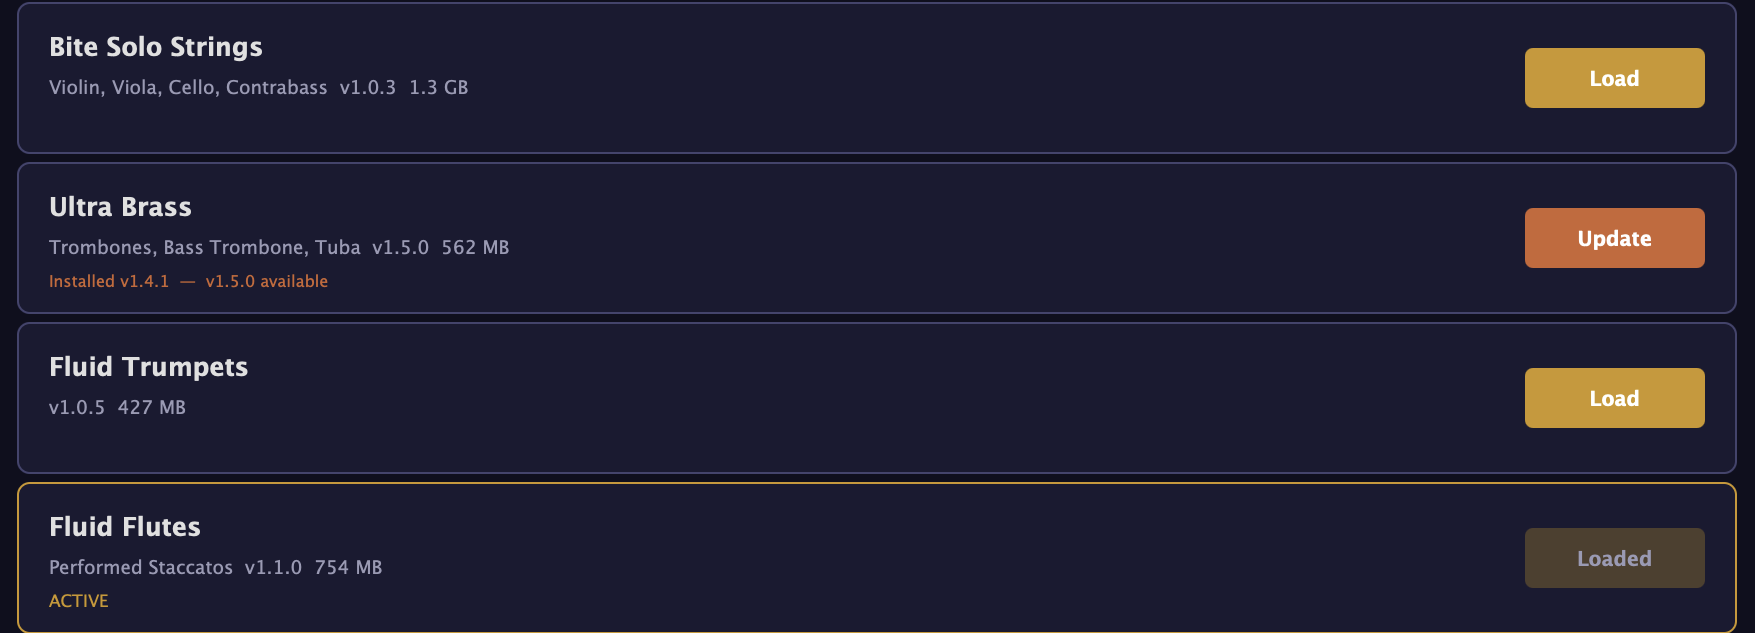
The bottom bar shows where samples are stored on your drive (Change moves it — useful for keeping libraries on an external SSD), which account you're signed in with, and Logout. Back (top right) returns to the main screen.
Chapter 3
The Main Screen
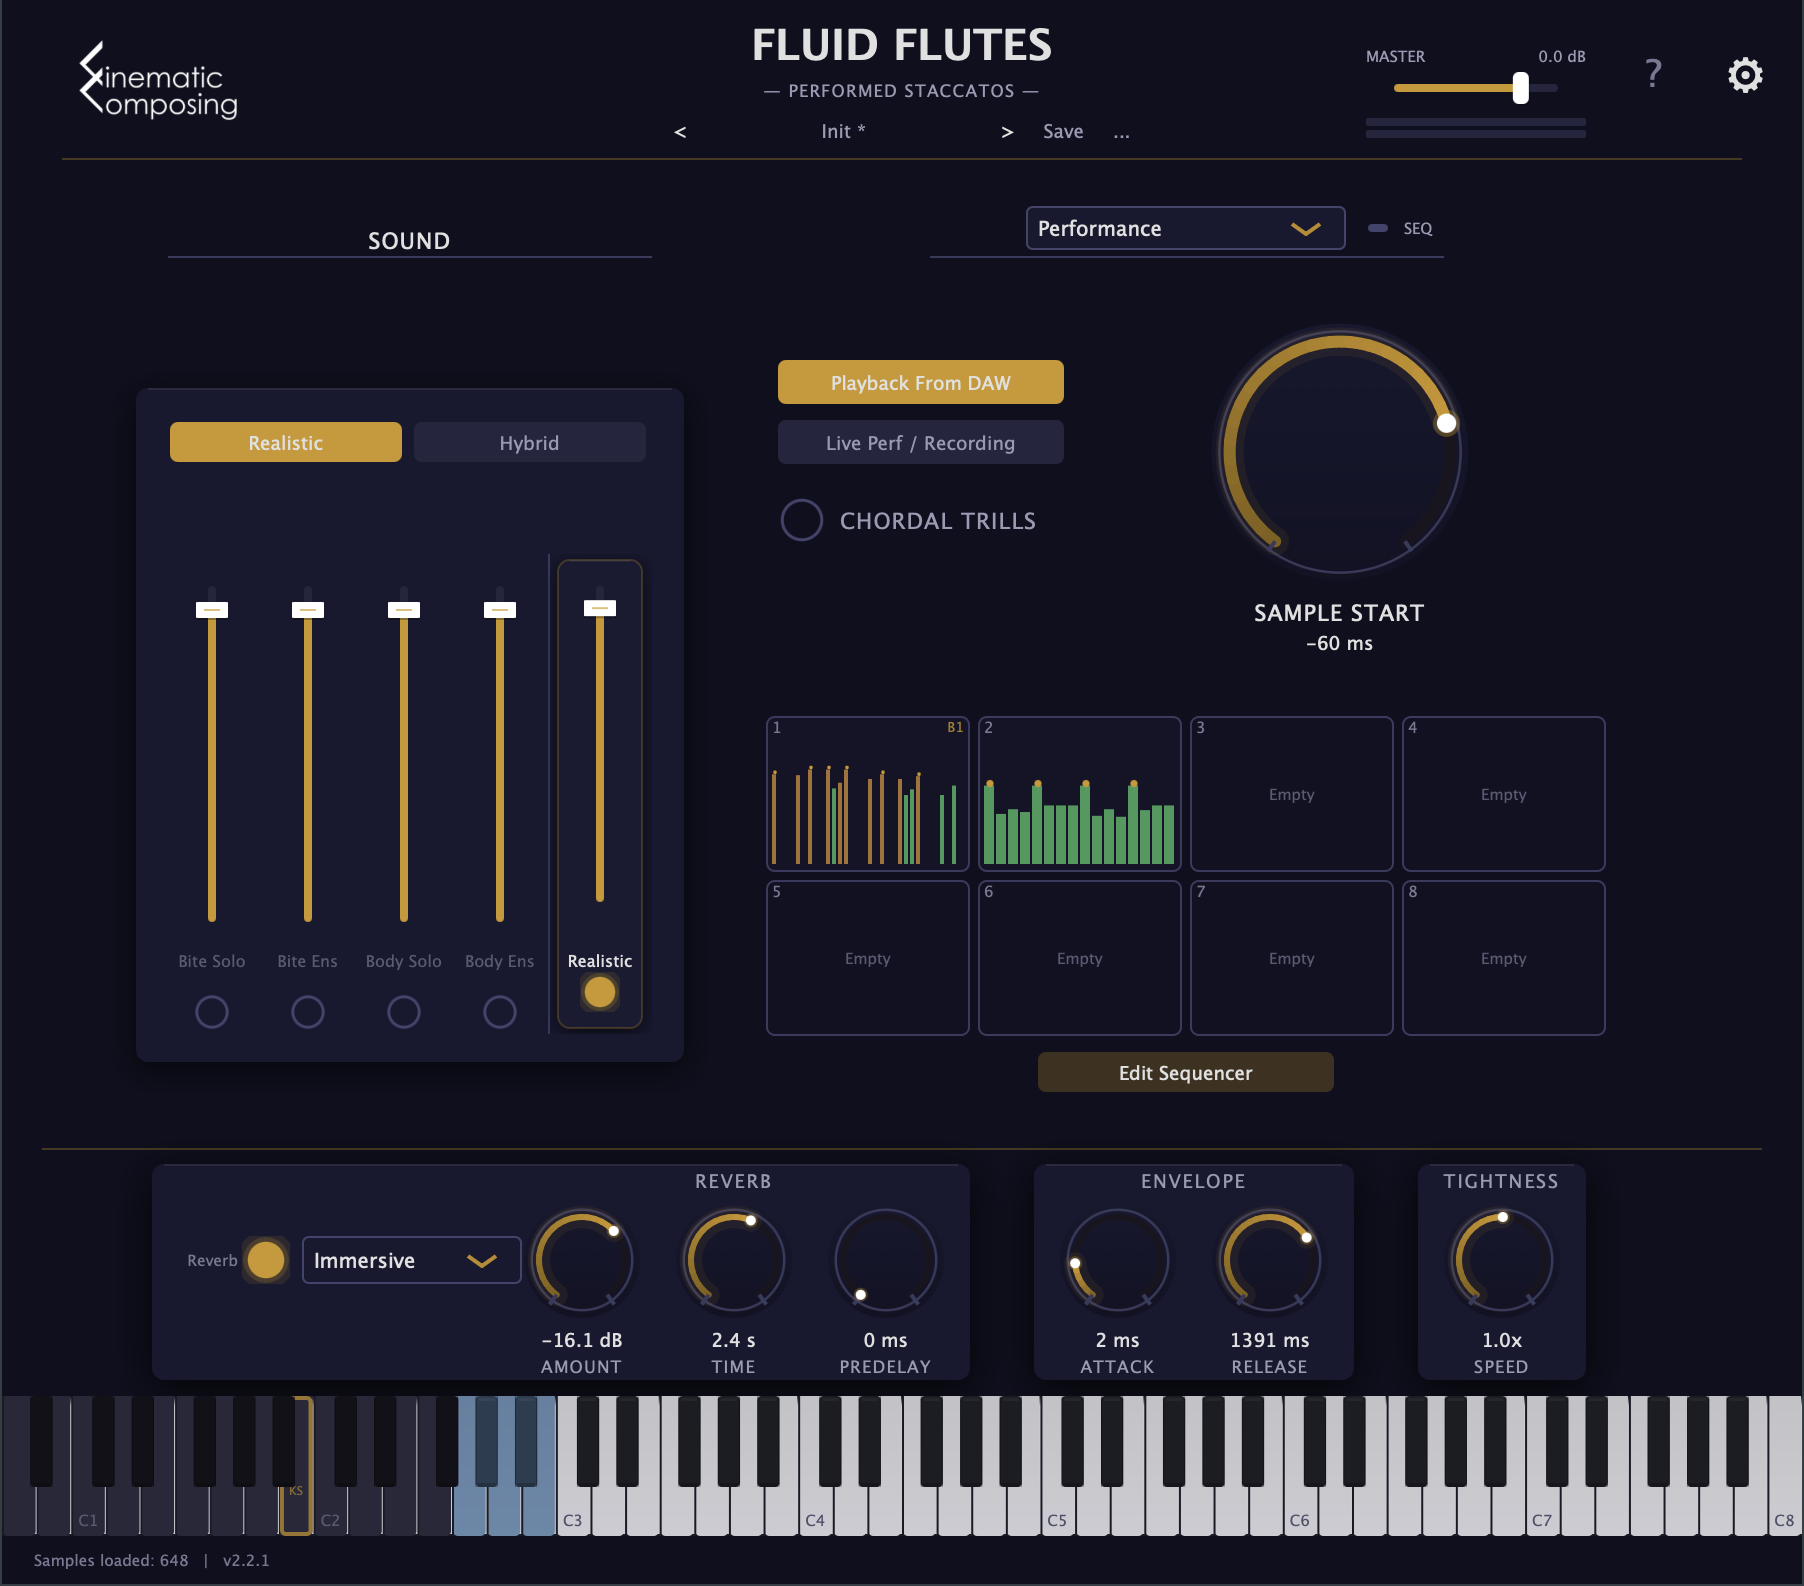
Four zones, top to bottom:
- Header — library name, preset bar, master volume with meter, gear button.
- SOUND (left) — the mic mixer: what the instrument sounds like.
- PERFORMANCE (right) — how it plays: Sample Start, playing modes, and the pattern section. The dropdown at its top switches between the Performance, Advanced, and Sequencer views — most of this manual's chapters live behind that dropdown.
- Bottom bar — Reverb, Envelope, and Tightness, always visible.
The keyboard
The on-screen keyboard is clickable (click lower on a key for a louder note) and mirrors your MIDI input. Key colors tell you what's playable:
- Bright keys — real recorded samples.
- Blue keys — extended range: the nearest sample, re-pitched. Usable, but the bright zone is the instrument's true voice.
- Dimmed keys — outside the playable range; silent.
- Gold-outlined keys marked “KS” — keyswitches that change sequencer patterns (chapter 7). They switch, they don't sound.
The footer shows how many samples are loaded in RAM and your plugin version. If a newer plugin exists, a banner appears at the very top — one click downloads the installer.
Chapter 4
Presets & Master Volume

A preset stores every setting in the plugin — mixer, knobs, sequencer pattern, everything. The compact bar under the library name is the whole system:
- ‹ › — step through all presets, factory first, then yours.
- Preset name — click it to pick from the full list. A * after the name means you've changed something since loading it.
- Save — overwrites your preset. On a factory preset it asks for a new name instead (factory presets can't be overwritten).
- … — Save As… and Delete (your presets only).
MASTER is the output fader (−60 to +6 dB, double-click for 0). The two thin bars underneath are the left/right output meter — they turn red as you approach clipping, so pull the fader down if you see red on loud passages.
Chapter 5
Sound — Mics & Mixes
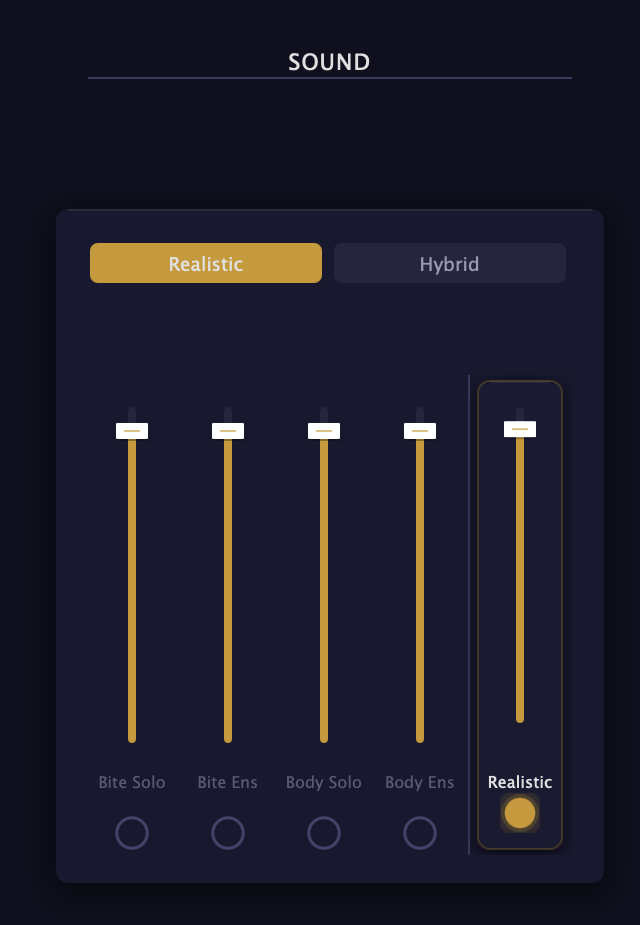
Every CC-Sampler library was recorded through multiple signal paths, and the SOUND section is where you choose yours. There are two ways to work:
- Use a ready-made mix — the Mix strip with the Realistic / Hybrid tabs above it. Realistic is the natural, balanced blend; Hybrid is a bigger, produced blend. This is the default and the right choice most of the time.
- Build your own blend — turn on individual mic strips (names vary per library — e.g. Bite Solo, Body Ens). Bite = bright and articulate, cuts through a mix. Body = warm and full.
Each strip has a volume fader (−60 to +6 dB, double-click for 0) and a power button. The two ways are mutually exclusive: powering a mic turns the Mix off, powering the Mix turns the mics off. That's deliberate — the ready-made mixes already contain the mics, so stacking them would double things up.
LOW · HIGH · FULL Bite Solo Strings
Bite Solo Strings adds three range buttons above the mixer: LOW (Low Strings — cello & bass register), HIGH (High Strings — violin & viola register), and FULL (the whole ensemble, default). They reload the instrument for that register, so the switch takes a moment.
Chapter 6
Sample Start
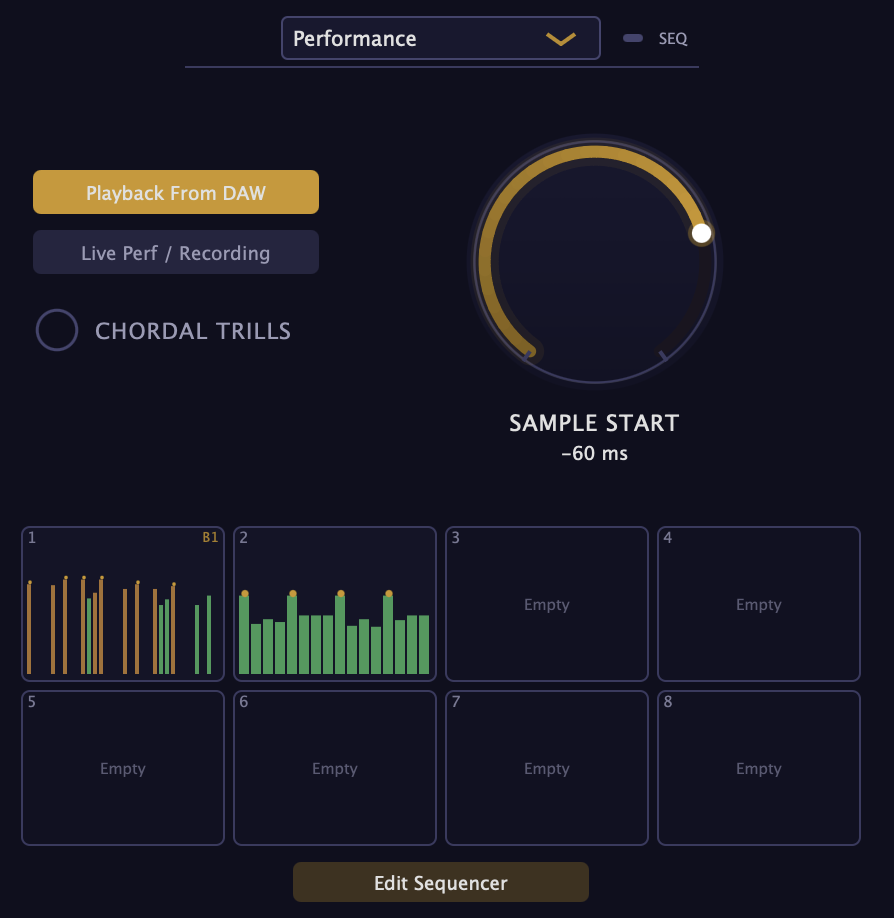
The big knob in the Performance view. Every note was recorded with its natural “breath” before the hit — Sample Start decides how much of it you hear.
Fully down (−250 ms) plays the complete natural attack — most realistic, but the hit lands late. At 0 ms the peak fires the instant you press the key — tight and rhythmic, less air.
The two buttons pick the mode for the job:
- Playback From DAW — uses your saved knob position. For sequenced parts: keep the natural attack and compensate in your DAW with a negative track delay equal to the knob value (knob at −60 ms → track delay −60 ms). You get full realism and perfect timing.
- Live Perf / Recording — snaps to 0 ms so notes speak instantly under your fingers. Drag the knob while in Live mode and it switches back to DAW mode automatically, remembering the new position.
Chapter 7
Sequencer / Arp
The sequencer turns held notes into rhythmic patterns — trailer ostinatos, brass rhythms, pulsing beds — while you just hold a chord.
Playing it
- Hold the sustain pedal. The pedal is the on switch.
- Hold notes or a chord. The pattern starts and loops, playing your held notes in its rhythm.
- Release the notes (or the pedal) to stop — unless Latch is on, below.
Left of the view dropdown, ACTIVATE: shows the two ways to switch the sequencer on — you only ever need one of them. HOLD PEDAL is the default and works as described above; its small light comes on the moment the sequencer is armed, so you can see the pedal working. No pedal, or you would rather not use one? Turn on ALWAYS ON instead and the sequencer stays armed permanently, so every note you play feeds the pattern with no pedal involved at all. Start picks when the pattern begins: Immediate (the moment you play), Next Beat, or Next Bar (both wait for your DAW's grid — with the DAW transport stopped they behave like Immediate).
Latch — playing with your hands free
Right of the view dropdown, LATCH changes what happens when you let go. Turn it on, play a chord, and take your hands off the keys: the pattern keeps running on those notes. Now both hands are free for filters, faders, a second keyboard layer — or the next chord. Click the light again to stop the pattern. Latch does not switch the sequencer on by itself: you still need HOLD PEDAL or ALWAYS ON first.
The dropdown beside it decides what a new chord does to a pattern that is already latched:
- Replace (default) — the new chord takes over from the old one. One chord at a time. This is how you walk a progression hands-free: latch a groove, then just play the changes.
- Add — the new chord joins the notes already sounding, so the harmony builds up as you play. To clear it, switch Latch off and on again.
- Transpose — one key moves the latched chord instead of replacing it or adding to it. Latch a voicing you like, tap a single note, and the whole thing shifts to that root exactly as you played it. See below.
In every mode, a note played while you are still holding a key simply joins the chord you are building. And the pattern never restarts when the chord changes — it keeps its place in the bar, so the groove stays locked to your DAW while the harmony moves over it.
Transpose — a whole progression with one finger
Latch a chord you like the sound of. In Transpose, a single key is no longer a note — it is an instruction: move the chord here. Hold C-E-G, let go, tap F, and F-A-C is playing. Tap G and you are on G. The voicing you played travels intact through the whole progression, and the key you tap never sounds by itself. One finger moves the harmony; a handful of fingers rewrites it.
- It follows the chord, not the bass. If you latched an inversion, tapping F still gives you an F chord — the plugin knows which note is the root.
- The octave doesn't matter. Grab whichever F is under your free hand. The chord stays in the register you put it in instead of leaping across the keyboard.
- It never drifts. Every move is measured from the chord you latched, so walking C, G, D and back to C lands you on exactly the notes you started with.
- To change the chord itself — major to minor, or a different voicing — play two or more keys together. That seats a new chord and the pattern keeps running right through it. What you press is what you get, so play the full voicing you want: two keys give you two notes.
Not to be confused with the Transpose row in the Advanced view (Chapter 11). That one is a set-and-forget knob that shifts every note you play by a fixed number of semitones. This one is a performance gesture that moves a latched chord while the pattern runs.
The favorites grid
The 2×4 grid on the Performance view holds eight patterns ready to fire. Click a slot to load it. Right-click for the menu: Assign Pattern… (fill the slot from the pattern list), Learn Keyswitch (press a MIDI key — that key now switches to this pattern, hands-free, marked KS in gold on the keyboard), Clear Keyswitch, Clear Slot.
Editing patterns
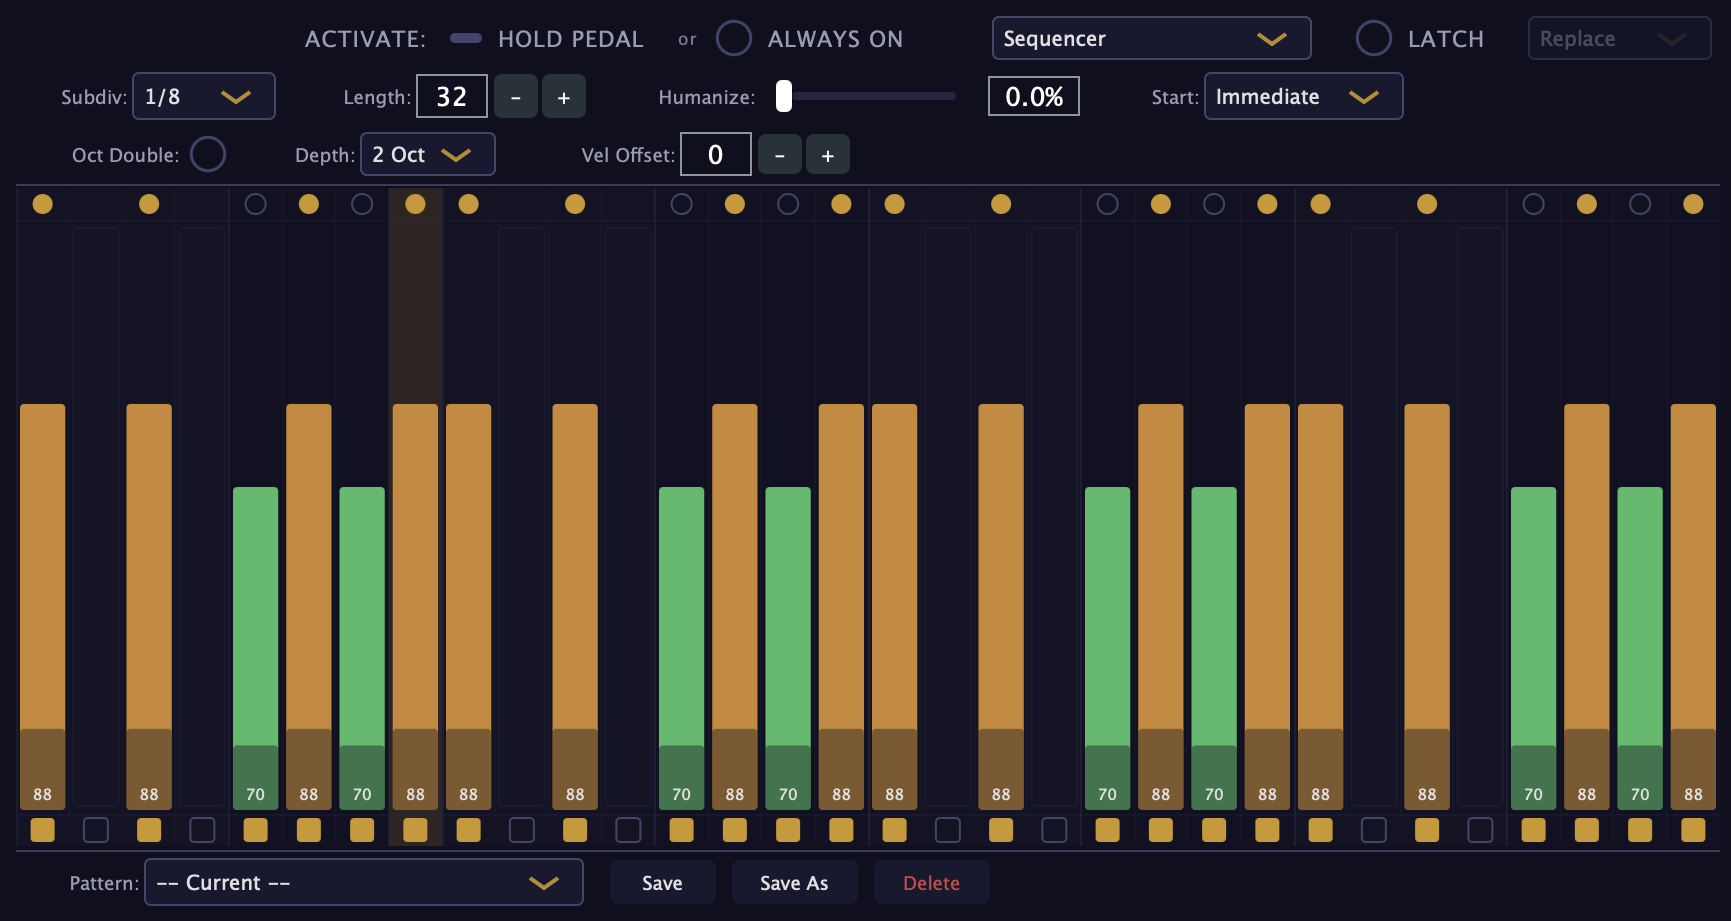
Each column is a step with three zones:
- Middle — velocity. Click or drag to draw how hard the step hits; sweep across steps to paint. Bars are color-coded by the dynamic layer they'll trigger: blue = soft, green = medium, orange = loud. Drawing on a silent step switches it on.
- Top — accent dot. Marks a step for octave doubling (below).
- Bottom — on/off box. Silences a step without losing its velocity.
| Control | Range | What it does |
|---|---|---|
| Subdiv | 1/4 … 1/32 | Step length, including triplets (1/8T, 1/16T). Default 1/16. |
| Length | 1–32 | Steps in the loop. 16 = one bar of 16ths. |
| Humanize | 0–100% | Adds subtle random timing and velocity variation — machine-tight at 0, played-feel as you raise it. |
| Oct Double | 1–2 Oct · Vel −10…+20 | Accented steps also fire a note one or two octaves below. Chord-smart: it doubles the root of whatever chord you're holding (the detected chord shows bottom-right). Vel Offset makes the low note softer or harder than the main hit. |
| Pattern | Load any of the 80 factory patterns or your own. The factory ones are pure rhythm — no pitch of their own — so the same 80 suit every library; each is named by its subdivision (01 · 1/4, 02 · 1/8…) so you can see the feel before you load it. Loading a pattern also sets Subdiv and Length to whatever it was written in. Save / Save As store yours; Delete removes yours (factory patterns are permanent). |
In a DAW the sequencer follows the project tempo automatically; the standalone app uses its own BPM setting (40–300).
Chapter 8
Chordal Trills Fluid Flutes · Pro
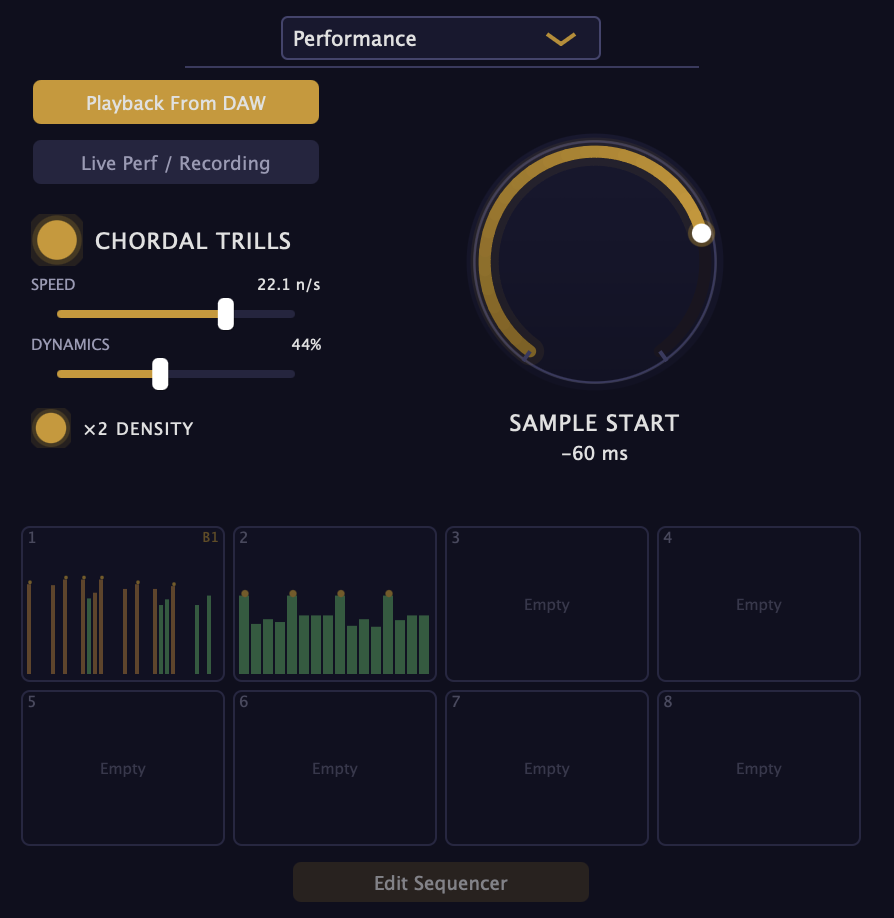
Hold a chord and the flutes trill between your held notes — a shimmering, unmeasured cloud of sound. Only the notes you're holding ever sound, so the harmony always stays yours. Hold one note and it simply plays normally.
- CHORDAL TRILLS lamp — switches the engine on. While it's on, the sequencer is parked (they'd fight over your notes); switch trills off to get it back.
- DYNAMICS — the loudness and intensity of the cloud. It mirrors your mod wheel (CC1), so the natural way to play is: hold the chord, shape the swell with the wheel.
- SPEED 4–30 notes/sec — how fast the trilling moves. Each library ships with the speed tuned by ear; touch it only if you want calmer or more frantic.
- ×2 DENSITY — doubles the activity for a thicker, busier shimmer.
Chapter 9
Dynamics Control
Every note exists in three recorded dynamic layers — soft, medium, loud. How hard you hit a key picks the layer (with a smooth blend between neighbors), so velocity changes the actual timbre, not just the volume. The Advanced view (dropdown above the Performance section) is where you reshape that response.
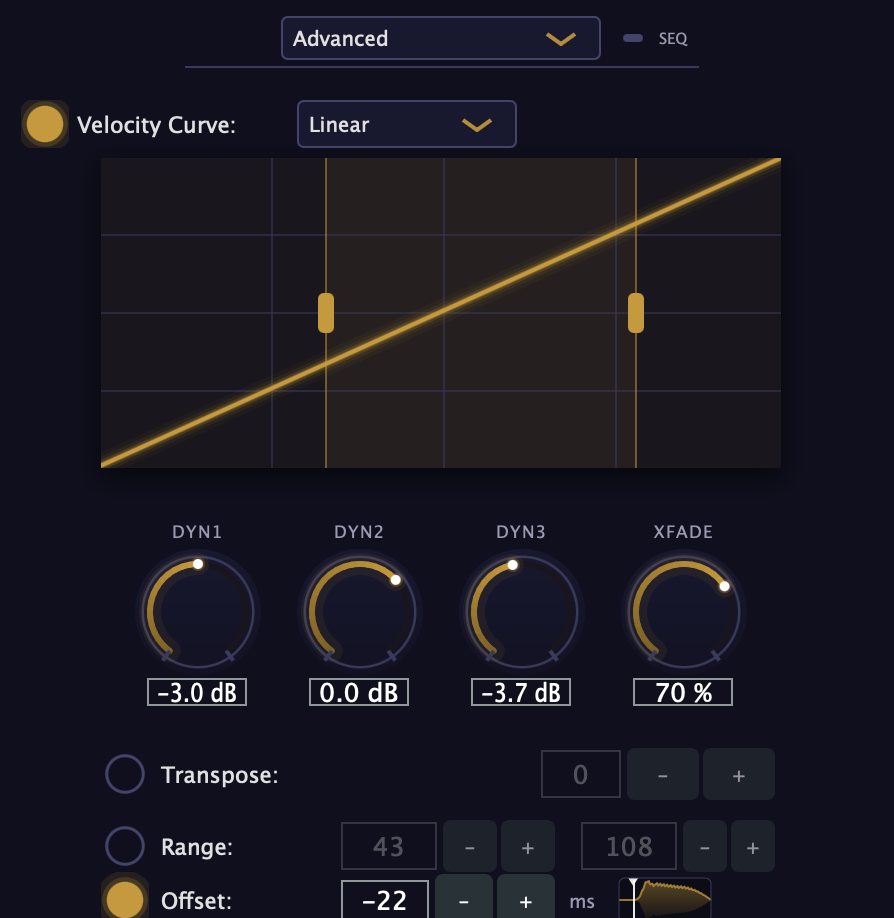
Turn the toggle on, then drag the gold curve up or down. Linear bends the whole response — drag up if your keyboard feels too quiet, down if everything comes out loud. Shelf is an S-curve that eases the extremes. Fixed ignores velocity entirely — every note plays at one set dynamic, ideal for drawing even ostinato lines. Cmd-click (Mac) / Ctrl-click (Windows) on the graph resets it.
Every note exists as three separate recordings — the players really did play it soft, medium, and loud. Left to right, the graph is how hard you hit the key, and the two gold lines are the borders that decide which recording answers: left of the first line you get the soft one, between the lines the medium one, past the second line the loud one.
Drag a line to move its border. If you have to hammer the keyboard to reach the loud layer, drag the second line to the left — loud now arrives with less force. If gentle playing keeps tipping into medium, drag the first line to the right — the soft layer gets more room.
How wide the blend zone around each split line is. 0% = a hard switch between layers; wider = the two layers overlap and crossfade, smoothing the transition (at the cost of a slightly less focused sound in the overlap).
Volume trim per layer. If the loud layer jumps out too much next to the medium one, pull DYN3 down a couple of dB and the whole velocity range evens out.
Chapter 10
Attack, Release & Tightness

Fade-in time for each note. Keep it at 2 ms for percussive playing; raise it to soften the front of the note — at higher values staccatos turn into swells and pads.
How long a note rings after you let go of the key. The default lets the natural tail and room breathe; shorten it for dry, clipped rhythms, stretch it for washes.
Time-stretches the samples without changing pitch. Below 1× notes get longer and broader; above 1× they compress into shorter, tighter hits — 2×–3× turns a roomy staccato into a trailer-tight impact. At 1.0× the engine is bypassed and the sound is exactly as recorded.
Chapter 11
Offset, Transpose & Range
Three rows at the bottom of the Advanced view. Each has its own on/off toggle — off means neutral.
A fine-trim on top of Sample Start, applied to every note equally. If the library feels a hair early or late against your other instruments, nudge this instead of touching Sample Start. The small waveform beside it shows exactly where in the recording your notes now begin.
Shifts incoming MIDI up or down before it reaches the samples — play in one octave, sound in another.
Restricts which keys sound. Set a low and high limit (shown as note names) and everything outside goes silent and dims on the keyboard — handy for splitting a keyboard between two instruments, or keeping a part inside its realistic register.
Chapter 12
Reverb
A built-in convolution reverb — the space of a real, world-class hall sampled and applied to your sound. The lamp on the left of the bottom bar switches it on.
- Preset — Immersive seats the instrument deep in the hall; Large & Close keeps it up front with the hall behind it.
- Amount −60 to +6 dB — how much reverb you hear. Around −10 to −16 dB is a musical starting zone.
- Time — the length of the tail, shown in seconds. Shorter keeps rhythms clean; longer blooms.
- Predelay 0–150 ms — a gap before the reverb starts. A little (20–40 ms) keeps the attack clear and pushes the room behind the note.
Chapter 13
MIDI Learn
Put any control under a physical knob or fader on your MIDI controller:
- Right-click the control and choose MIDI Learn. It pulses gold.
- Move a knob on your controller within 5 seconds. Done — they're linked.
Right-click again to see the current mapping or Clear it. One knob per control, one control per knob. Mappings are saved with your DAW project. Works on faders and knobs everywhere in the plugin, and on the button pairs too (Realistic/Hybrid, Live/DAW, the trills lamp — for buttons, controller values 64 and up mean “on”).
Chapter 14
PRO Features
Some libraries sell in more than one edition — Fluid Flutes, for example, offers the Sequencer and Chordal Trills in its Pro edition. If your edition doesn't include a feature, it stays visible but greyed out, marked with a small gold PRO.
Clicking the greyed control opens your customer dashboard, where upgrading is one click. Back in the plugin, open Your Libraries (gear button) once — the feature unlocks in place. No re-download, no restart.
Chapter 15
Library Reference
What each CC-Sampler library brings to the controls in this manual:
| Library | Instruments | Mics & Mixes | Playable Range | Special |
|---|---|---|---|---|
| Ultra Brass | Trombones, Bass Trombone, Tuba — performed staccatos | Bite Solo · Bite Ens · Body Solo · Body Ens + Realistic / Hybrid | E1 – D5 | Sequencer |
| Bite Solo Strings | Violin, Viola, Cello, Contrabass — solo staccatos | Bite · Body + Mix (Realistic / Hybrid) | E1 – F6 (FULL) LOW E1 – G4 · HIGH C3 – F6 |
Sequencer · LOW/HIGH/FULL range modes |
| Fluid Trumpets | Trumpets — performed staccatos | Bite Solo · Bite Ens · Body Solo · Body Ens + Realistic / Hybrid | G3 – G6 | Sequencer |
| Fluid Flutes | 6 flutes, Bass Flute to Piccolo — performed staccatos | Bite Solo · Bite Ens · Body Solo · Body Ens + Realistic / Hybrid | G2 – C8 | Sequencer (Pro) · Chordal Trills (Pro) |
Chapter 16
FAQ & Tips
- Does it work offline?
- Yes. Sign in and download once; after that the plugin and your libraries work without internet.
- How much RAM does it use?
- Only powered channels are loaded. One mix channel is a few hundred MB; every channel of a big library at once can pass 1 GB. The footer shows the live sample count — power off what you don't use.
- Can I keep libraries on an external drive?
- Yes — Your Libraries → Change, pick a folder on the drive, then download there.
- Do my settings save with my DAW project?
- Everything — knobs, mixer, patterns, MIDI mappings — saves and restores with the project automatically. Presets are for carrying sounds between projects.
- How do I update?
- Plugin: click the banner that appears at the top when an update exists. Samples: the library row shows Update in Your Libraries, and the footer notes “New samples available.”
- The plugin asks me to log in inside my DAW and nothing happens.
- Some DAWs sandbox the browser handoff. Use Or paste your token on the login screen: sign in on the website, copy the token it gives you, paste it there.
- Notes feel late when I play to a click.
- That's the natural attack (chapter 6). For live playing, hit Live Perf / Recording. For programmed parts, keep DAW mode and set a negative track delay equal to the Sample Start value.
- Where do I get help?
- Your customer dashboard at cinematiccomposing.com — account, downloads, and support live there.